Category Archives: Crappie Fishing

Ready for Fish

IMG_0018I have worked out most of the bugs I believe , and I am about ready to get the fish. I am planning on building a water heater using compost as the heat source, so that I can raise Talapia . But for now I am going to start with blue gill. I had a to do some work  getting the timing down on the two pumps. Ended up getting a different timer to run the pump for the grow beds. Now the system is running well. I did water checks the other day and all thee readings were in the proper ranges. I will go out and catch the blue gill so if there is a problem it wont be with a tank of fish that cost me very  much.

IMG_0023
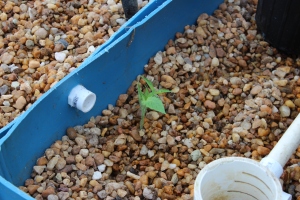
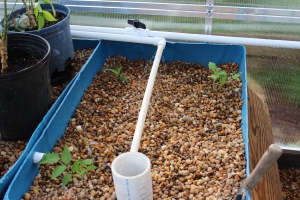
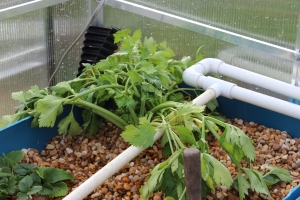
As you can see my celery has not bounced back from the transplant yet. This is the celery I planted the end of from store bought . It has done well since early in the summer we I put it in the other system. We have eaten off it for quite awhile.  Hopefully , now that the timing  is worked out it will come back.

IMG_0019IMG_0020IMG_0021IMG_0022  
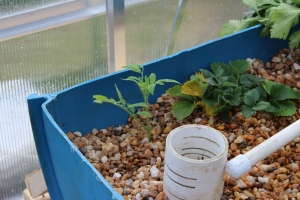
I added some tomato that I got from the volunteer plant I have coming up in one of the cinder blocks at the base of the Green House. This is also the strawberry that was in the first system.

IMG_0024IMG_0025IMG_0026IMG_0027 
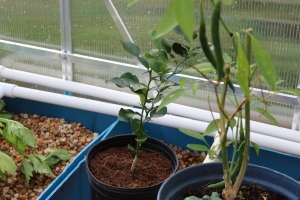
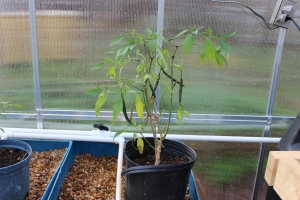
These are cayenne peppers that came out of the garden and a Coffer Lime tree. I am over wintering in the GH. The frog is just cool…..lol

IMG_0028Here is the volunteer tomato I have it tied up with some red tape going to see how big it gets. It already has blooms so we should have some hot house tomatoes soon.

IMG_0029
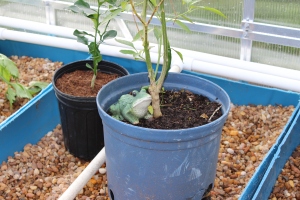
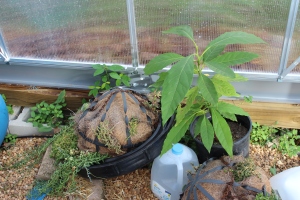
My succulent balls are in here also I have to do some work with them once I get the benches built. That is my Avocado  tree it is also over wintering.

IMG_0030
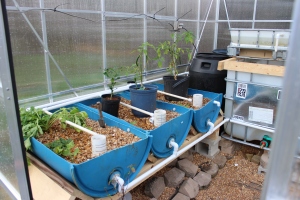
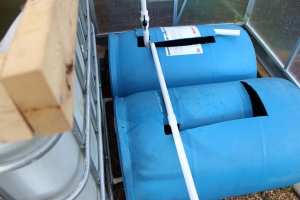
One of the changes I made was to run the return line from the grow beds to the drum that has the pump in it. The two are tied together (see front bottom ) but it pumps out faster than they equalize. So this way the one with the pump fills faster.

IMG_0031
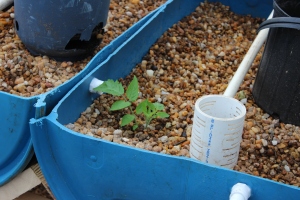
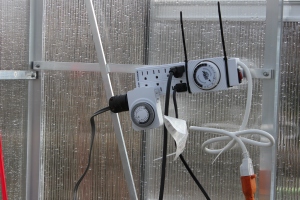
This is how I first tried but it didn’t work, so got another timer like the one with the multiple sockets. So this is how it looks now.IMG_0051IMG_0052

IMG_0041
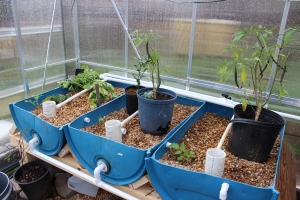
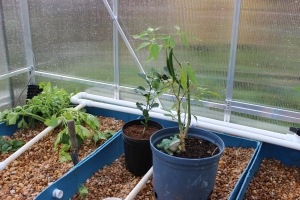
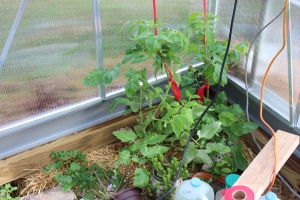
I have also move all the tomatoes into the one bed.IMG_0050
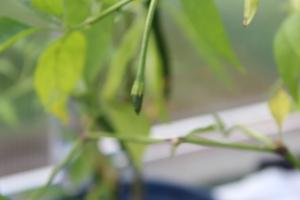
Here you can see that the peppers are still bearing new fruit,  this is the middle of December here in NC and we have had several frosts . I still don’t have any heat in the GH but it stays above 50 F.

So now I need to find some time to go fishing and catch some gills. hopefully soon.

From my family to all of yours Have a Merry Christmas and a Happy New Year!

Got More Barrels :oD

Went yesterday to Pink Hill NC to get the rest of the barrels I needed to complete the system. I pick up 2 of the blue barrels 55 gal,with the bung holes that will be cut in half to make the Grow beds.  

I also picked up 4 black pickle barrels, 60 gal ea.  Two of these will be in the system and 2 for rain barrels.

I got the pickle barrels all cleaned out and ready to go . The blue ones I did a little bit on them I will get them thoroughly after I have cut them in half.

These are the 2 that will be the rain barrels.

Here are the two pickle barrels in place .

My original system had a catastrophic failure Sunday. THe left bank of grow beds had been slipping slowly toward the pond.  So I needed to do something anyway , well one of the totes broke at the bottom and I was lucky I didn’t loose all the water. So I took the left bank out and the flood tank out. I piped the water directly to the right bank of grow beds. So they are now running continuously.

The rest of these are some plants I have brought into the green house because the nights are getting cooler.

The milk jugs are filled with water , part of the thermal mass.

OK thats it for today ,will start the plumbing tomorrow. Hopefully I will be able to get it up and running soon. Might be running on a extenion cord for a little bit , I will eventually get it wired …I know Eric I will call before I start tat  LOL..

Did you notice the volunteer tomato I have coming up out of the cinder block hole. I will keep it and see what it does. The rest are weeds and I will get rid of them.

All Framed Out

Got started today around 0800 when my friend Eric arrived.  With the exception of installing a few pieces backwards and not installing the extra bolts when the instructions said to and having to back track and correct those, it went really well. Could not have done it without the help of my Bud Eric though.

As you can see in the photos above we got everything done minus putting the door and windows in , and then installing the clear panels.  The shot of the tarps show that we whittled down the number of parts. Tomorrow I hope to get the rest of it done.

Who Supports Your Right To Fish??????

Just another reason I support a change….re-enforces why I will vote Obama out!!!!https://i0.wp.com/api.ning.com/files/iZhPFFAeUVCrAtpJ0JMQ8jH*S8bZNrx*eZtMmyXvp1-*q9IbZbDUZ9Y93DIddVHWVQ6SbO0GFYwQgIKcst3I7A__/bilde.jpg

Governor Romney Supports Rec Fishing

And lest we forget the Walton Foundation(ie Wal-Mart ,Sams)..Enemy Number One to Sportsmen and commercial fishermen….

The Walton Foundations 2011 Grant Report

IBC and Barrels

I drove over to Pink hill and met a Brent Kennedy of Cabin Creek barrels Monday. Very nice elderly gentleman who had the IBC and Barrels at very fair prices.  His IBCs are just about new only having been used one time. They held animal proteins the hog farmers use to supplement feed. They get them in used the product and throw them out, their waste my good fortune. He also had both 65 gal pickle barrels and blue 55 gal plastic barrels. I would have loved to gotten 2 of the blue and 2 of the pickle barrels along with the IBC but just could not fit then all in the truck. I mention how fair his prices were, $10 ea for the barrels and $65for the IBC in the cage and on the metal pallet. pretty good huh.

I got the IBC cut down yesterday, cut the bottom of the cage off at 8 inches and 8 inches off the top of the container. Will use the bottom of IBC in the top of the cage as the fish tank. I will use the bottom of the cage and the pallet with the top of the IBC as a raft system growing leafy vegetables like lettuce , boc choy, pac choy, and u choy.

Here the IBC has been cut and stacked so I could move it with a hand cart.

You can see the top ins in the bottom of the cage and above is the bottom of the IBC in the top of the cage.

I screwed up a little on the cut meant to cut at 8 inches but actually on one side drew the line at 6 so a little off but should not be that big a deal.

The Barrels all ready to go.

Today I got out and and finished getting the foundation in place. I have a buddy coming by in the morning that will help me put the frame on the foundation. Then we will get to remove the soil from the inside and start covering the brush in the Hugelkulturl.

I am enjoying a little alcohol and Percocets, after all the squatting placing those blocks today . I even found some Bio Freeze. So not doing to bad right now. Wait till to morrow evening lol.

Hugelkultur??? Give it a Shot???

I read about Hugelkultur on line several places and I just happened to have a lot of wood and brush laying around. So going to give it a shot.  If you don’t know what Hugelkultur is you are not alone,I didn’t eithier. Of course I couldbe wrong and you and I are the only ones who do not know… any here is what Wikipedia has to say about:

Hügelkultur

The practice of making raised garden beds filled with rotting wood.[16][17] It is in effect creating a Nurse log, however, covered with dirt.

Benefits of hugelkultur garden beds include water retention and warming of soil.[16][18] Buried wood becomes like a sponge as it decomposes, able to capture water and store it for later use by crops planted on top of the hugelkultur bed.[16][19]

The buried decomposing wood will also give off heat, as all compost does, for several years. These effects have been used by Sepp Holzer for one to allow fruit trees to survive at otherwise inhospitable temperatures and altitudes.[17]

That said what I get from it is Lasagne bed. Just layering material over logs and rotting wood. OK so that is what I have started. I removed all the top soil from the bed and just for lack of a better place to put it I moved it inside the green house frame. This is all soil that I have been amending for several years with compost in my raised beds. I will use this on the hugelkultur bed along with the top soil from the green house site.

This is the bed with the wood and brush I had around the yard. I also used the old rotting lumber that was the other two beds.

I am not going to make a traditional hugelkultur, in that it wont be six ft tall and about 4-5 ft wide. This will be 4 ft wide and how every tall it gets. I might have to bring in some extra top soil, we’ll see.


this was just some shots around the yard. My better half Sharon told me that i needed something in the picture of the tree frog for scale to show how small they really are.

Going to get the IBC and two blue 55 gal drums that will be the grow beds. Once I get them and the IBC dug in I can put the green house up. I will get hem tomorrow, have to drive over Beullaville to pick them up , that will take most of the day tomorrow.  But I will be sure to get pictures.

Comeing Along Slowly

Ok I am really taking my time doing this. I got started on the foundation , about half of it is done. But today has been raining off and on all day so will get back to it next week. I did get some pics of the work so far and a few of the rest of the yard.

This slideshow requires JavaScript.

Back Again

Sorry that it has been a while since I have updated this blog. I have been swamped lately. These are some pic I took this morning to help explain how the valve on my flood tank works. this a post from a forum that I am a member of.

I will take some better pictures of the flood valve tomorrow and post them. It is pretty simple , It is a soda bottle with a hole in the cap and the bottom cut out. It is connected via fishing line over two wheels to a toilet tank valve. There is a tube coming out of the flood tank at a height that will fill the grow beds when it empties. The tube directs the water that over flows through it to the bottle. As the bottle fills up,  the weight of the water in the bottle overcomes the weight of the water in the tank holding the valve closed. This then essentially flushes the tank through the tee valve at the bottom then to the grow beds. As the water drains out of the bottle the weight of the valve over comes the weight of the empty bottle and closes the valve to stop the flow to the beds.

Here are some pictures from this morning:

This shows the bottle and the overflow tube.

This is the hole in the cap of the bottle.

This shows the line ans the safety pin holding it.

Better look at the pin and swivel.

The wheels are from a sliding door repair kit.This is shot of the toilet tank valve. The rusty piece you see are washers that I added fro weight to help the valve close when the water empties from the tank.

And here are several form the grow beds , as you can see the peppers really seem to like the growing in the system.

This bed is sort of experimental, I have celery growing from the bottom of a celery I bout at the store. Also some Okra And some onion that are growing from the bottoms of green onions I also cut off others.

In the above are tomato’s that were suckers pinched off my garden tomatoes, and more Okra and onions.

Here are just some of the pepper on the plants. I have already canned 7 pints of pickled hot peppers.Won’t be long before I need to put some more up.

I hope that explained it for . If you have any other questions about the system don’t hesitate to ask. That said I am very new to AP systems and I am learning as I go.

Got my New Camera

I got my new camera last week . Have been waiting to get this for a while now. So hopefully my photos in the blog will be higher quality. I got the Cannon Eos Rebel T3I

Ok enough about that lets get to the Aquaponics . Things are looking good for the most part. The fish are very active, and seem happy ,they are going pretty fast. The water is testing in the good for all tests. It is a little cloudy, added some barley extract hope the will help. We have had quite a bit of rain and I wonder if that has anything to do with the cloudiness. My flood tank is also giving me some concern. It tends to bulge at times . this causes the toilet vale not to open sometimes. I think I need to put some more straps going over the top on it.  Ok here are some pictures:

Romaine Lettuce and a small tomato (sucker from dirt garden tomato)

Here are peppers and a Leaf lettuce mix

The radishes under the pepper are going strong.

The tad poles are still going strong

Finally It Is All Coming Together


   Well it has been a few days since I have posted here . I would like to say it is because I was so busy working on the system , but in fact it is because I was lazy. I have been working on my system though.  I ran into a few problems , that  hopefully (fingers crossed) I have them all fixed at this moment.  None were that complicated, most could have been avoided, with a little more planning on my part.  So with several trips back and forth to Lowes , I got it all together. 

   The Flood tank valve gave me some trouble. First I had the overflow tube set to high in the tank. When I filled it up with the hose it really started to distort and bulge. I thought it was going to rupture, so I emptied it and lowered the overflow tube . Next  I had to add some washers to the flapper chain , it would not close when the bottle empted.  The washers did the trick.  It is working fine now. 
   
    The next problem  I had to deal with was, the grow beds , they did not fill evenly. The outboard beds seemed to be filling about twice as fast as the inboard ones, and the ones in the middle were faster than the inner but slower than the outside ones. I solved this by adding a valve in front of the second and third grow tanks. By restricting the flow I was able to even out the fill rate. Thinking about it now a tube between each bed would have probably done the job., and I will probably do that also once I get the gravel .
   My Bell Siphon was working fine but I used 1 inch PVC for the stand pipe and had a coupling at the bottom. The 1 1/2 inch pipe I used for the Bell would not go over the coupling , leaving about 2 1/2 inches of water in the bottom that would not siphon. So I upped two a 2 inch pie for the Bell . Now it siphons almost all of the water out.
     Up until now all the fittings had been dry fitted. Today I glue most of them I did leave a few just dry fitted though. Since the drain on the flood tank goes through a hole in the pallet it sits on I left the connections to the T connector from the feed pipes to the grow beds  unglued. This is so that if I do need to remove the tank I would not have to cut the pipe and get a new Tee. I also left the stand pipe connected to the pump and the elbow at its top dry fitted . Basically some thinking as above . I have no leaks at any of the dry fit areas. I did have a leak at the bottom of the flood tank., the toilet valve was not fitting exactly right and I had a small constant drip. I pulled the tank and sealed the base of the valve on the inside and out, took care of the leak.
     Lastly , ok this wasn’t a problem just wanted it, I added some trailing ground cover plants to the front of the pallets that support the Flood tank. Had the pots, that are meant for railings, on hand so why not. It adds to the relaxation factor. 
I got my Fresh Water test kit in yesterday, I had ordered from Amazon. I tested the water yesterday and think it is doing well, haft to do some research on proper levels for gold fish. The PH read 7.6, Ammonia 1.0,Nitrites .25, and Nitrates 2.0, all but the PH is measured in parts per million. This morning I started thinking about the PH. reading, it is at the highest on the regular PH. test. The kit also came with a test for higher PH. When I tested that this morning it was at 7.8. This is a little high for gold fish , this is what I have to research.